A better way to use pCloud with Synology Cloud Sync


Some Context:
pCloud will not provide a high functioning and reliable WebDAV service and they appear to have removed all documention of their WebDAV server from public eye.
pCloud Provides an API that seems promising for developers to integrate with however in practice there seems to be similar reliability issues with their api as well that prevent apps like RClone from serving a more reliable WebDAV server on a Synology NAS locally which has lead personally to filename and even data corruption at the source when I only wanted to use this as a backup location anyways.
Synology has had many users request pCloud be added to their Cloud Sync DSM app or even HyperBackup and there appears to be no interest for Synology to adds pCloud as a first class citizen to these apps.
The Current known working solution:
The only solution that appears to let me use my lifetime pCloud storage from my Synology NAS is to run RClone in docker and perform a one way sync. Nothing else has been stable and so far I have been able to backup a Terabyte of data in a few days using this method on my slow internet connection. It has not errored out on any file either and hasnt crashed my internet thanks to a clever bandwidth limit. It also cannot mutate my source data either thanks to read only Docker restrictions. And best of all it lets me automate my backup to pCloud while still leveraging client side encryption. This prevents unauthorized access to my backups and uses an open source encryption that I can read on any platform if I need to.
To sumarrize, the benefits are:
- Stable file transfers that are fast.
- Source files cannot be mutated incorrectly.
- Can use Client Side Encryption using a method that can be read on many different platforms.
- Can easily set or adjust rate limiting so you do not crash your home internet.
- Can backup any folder on your Synology NAS
- Runs in any DSM that can run docker.
- Easy to configure and update settings.
- An Integrity check can be run to confirm backup is ready for a recovery event.
- Progress can be monitored by checking the container logs or opening a Terminal connection to watch progress updates live.
The down sides are:
- Currently only a one way sync is stable, although bi directional syncing may be an option later.
- Cannot use built in propritary apps such as Cloud Sync or Hyper Backup.
- It will overwrite and erase anything in the destination path (pCloud) that does not exist in the source paths (Your Synology NAS)
So lets get this setup shall we:
- Login to your Synology DSM
- Open Package Center and confirm you have Container Manager or Docker installed. if not install it.
- Open Container Manager
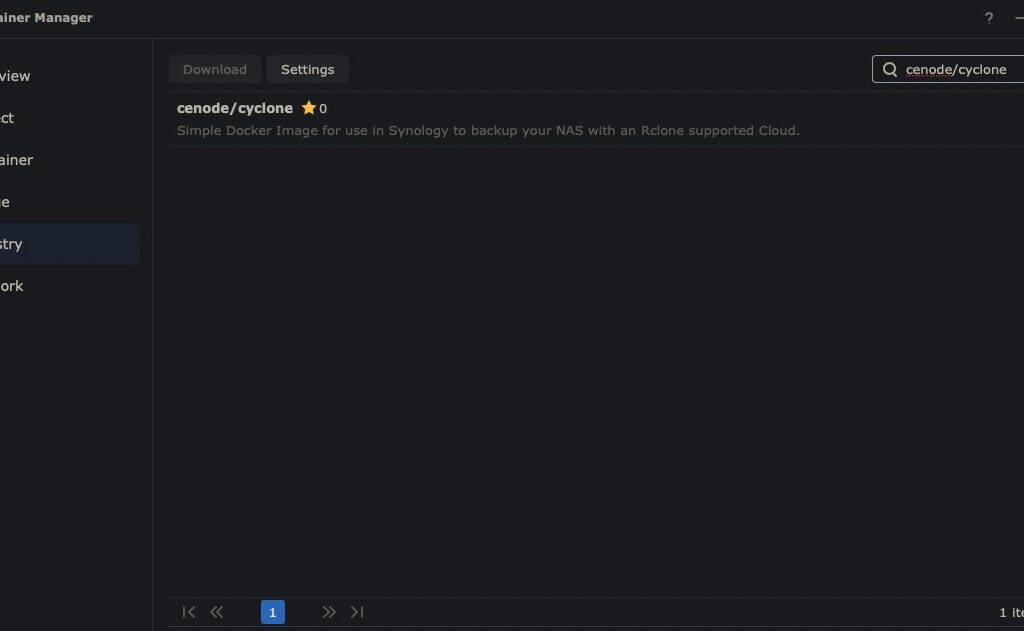
- On the left select registry
- Search for cenode/cyclone
- Select it and click download
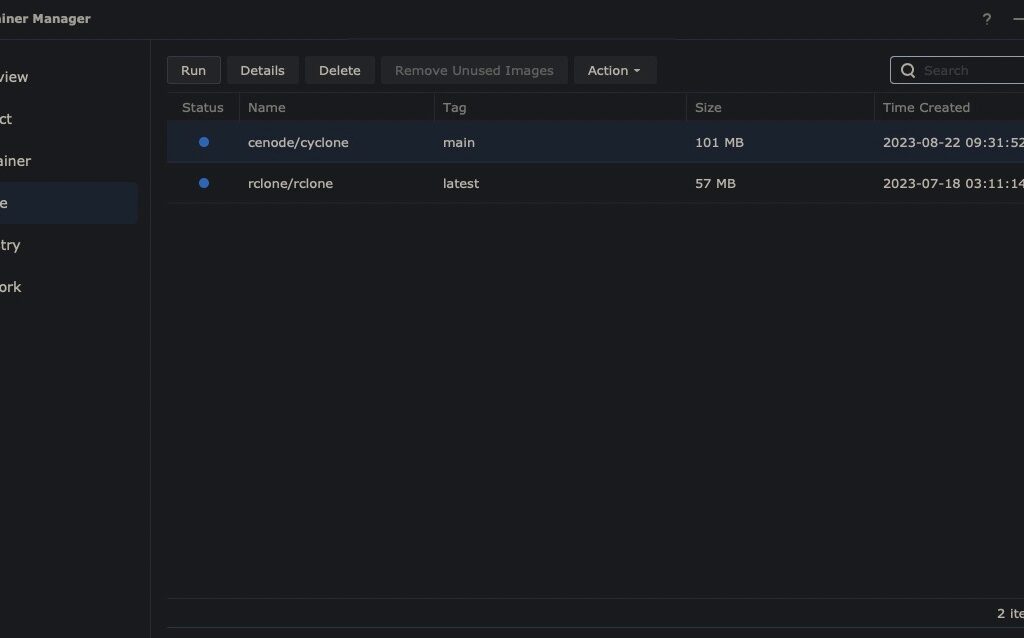
- Then on the Images Tab select cenode/cyclone and click run
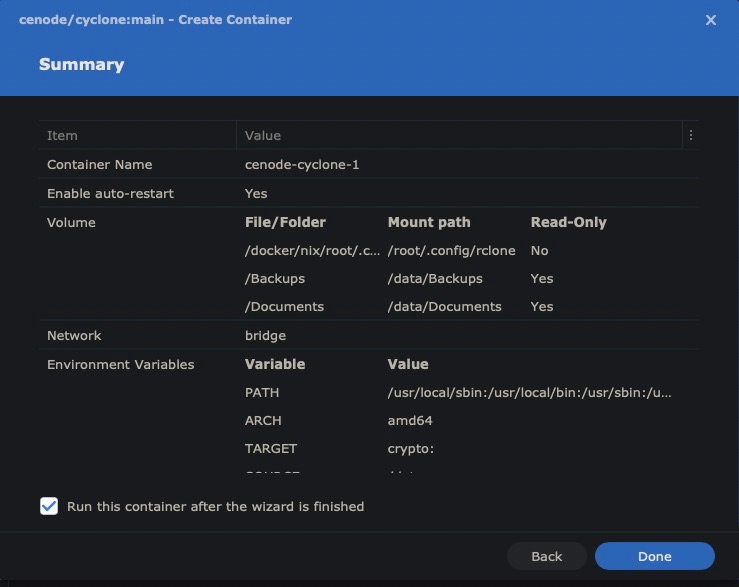
- Give your container a name such as pCloud Backup
- Enable Resource limitations if you so desire
- Enable auto-restart
- Under Volume settings:
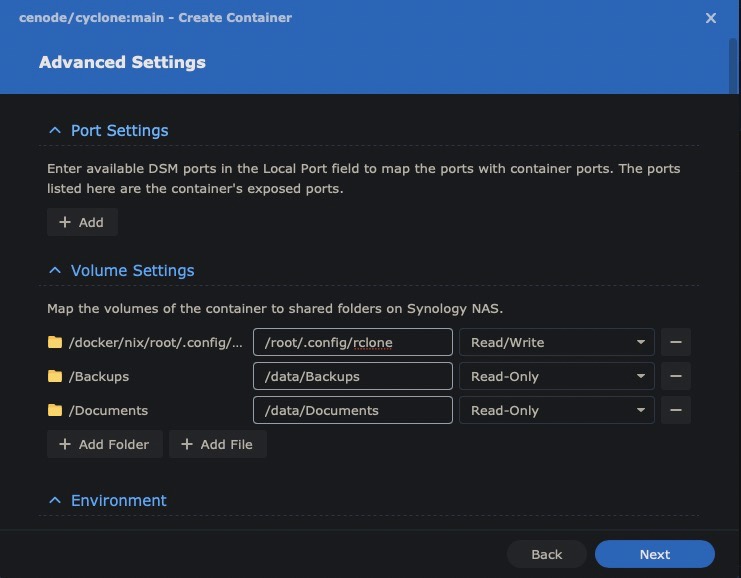
- Add the folder that contains your configured rclone.conf file to the location `/root/.config/rclone/` and make this volume Read Write
- Add any other folder on your Synology NAS and set the location to something under `/data/` for example if you select a folder named Backups from your Synology NAS you can enter `/data/Backups` for the container location. These locations should and can be Read-Only to protect your source files from any unintended mutations.
- Repeat step 2 for any other folders you want to backup and just use unique folders inside the `/data/` directory for each Synology Folder.
- Under Environment Settings:
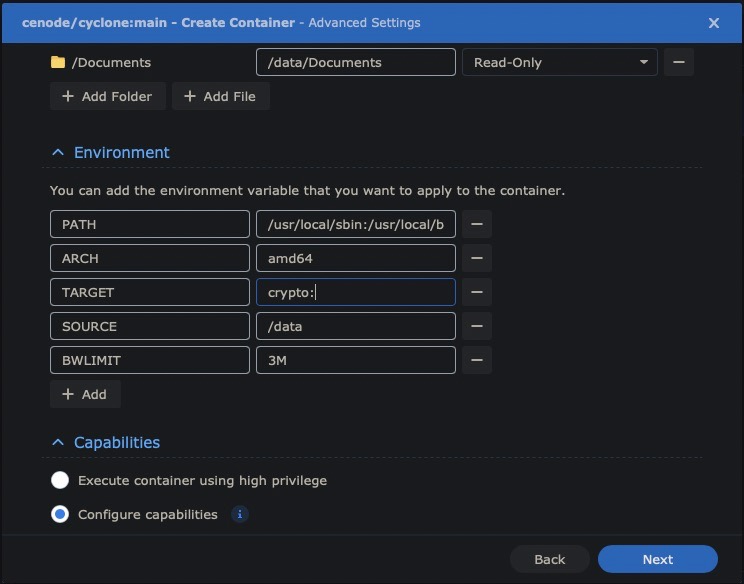
- Set target to any remote name you have configured in your rclone.conf file you used in step 11.1 for example `pcloud:` you must include a colon in the TARGET environment variable and if you wish you can even sepecify a folder path inside your remote stroage account by using directory path style naming such as `/path/on/cloud/account` after the colon for example `pcloud:/path/on/cloud/account`
- Set SOURCE Environment Variable to `/data` if its not already set to this for you.
- Run a speedtest.net test and gather your upload speed. Let’s say it reports 35Mbps divide this number by 8 so mine would become 4.375MBps then set this to say 50% so you do not saturate your internet connection which would be about 2M which is what I would set the Environment Variable BWLIMIT 2. If you need to you can also use other units of measure the same way say using K for Kilobytes/kilobits.
- Click next, check the box to run the container if not already checked and click done.
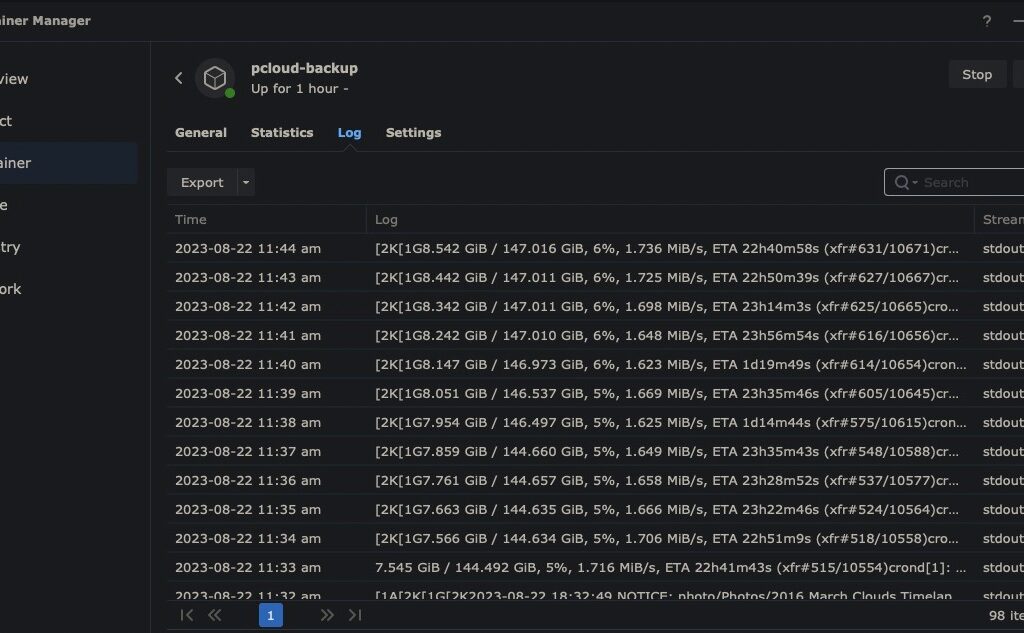
- Switch to the Containers tab on the left and click your container name.
- Click logs and every 5 minutes or so you should se a progress update that shows generate stats about the task.
- If you click Actions and Open Terminal a window will show up that will live update you with the stats of the backup every 5 minutes or so.
- Your done your backups should run constantly in the background creating a copy to your rclone remote whether thats pcloud or anywhere else.
- To run an integrity check you can use the rclone sync command with a regular rclone registry container. I can write that guide if enough people request it.

Note: To use Client Side Encryption use rclone config to add an Encrypt/Decrypt remote to an existing remote where you will setup a password for the encryption and then use that remote name when setting up the Cenode/Cyclone container.
Note:
If you stop the container you can update the BWLIMIT or Source and Target environment variables or add and remove folders from the volumes.
The rest of the article is a legacy method that I do not recommend
Since writing the original article I noticed issues with the latest DSM 7.2 as well as how pcloud’s api was responding with a lot of errors that rclone cannot handle alone.
I no longer recommend using pCloud with the built in tools Cloud Sync or Hyper Backup from DSM and instead recommend you use just the DSM Container Manager and Rclone as a one way sync.
This has benefits too in that it uses an open source tooling that seems far more stable and has the added benefit of running integrity checks and using client side encryption if you so wish.
Previous Solutions and why they are not very good:
- Turn off 2FA for pCloud account and use WEBDAV:
- This has inherent security concerns
- Using this method appears to be unnofficially supported as pcloud.com no longer mentions the endpoints for this implementation in their F.A.Q.
- Pull data to pCloud using something like multcloud.com
- Great idea except for if the NAS is not publicly facing or is on a Double NAT network
- In my experience it doesnt seem to work and freezes quite often.
My Current solution and its benefits:
I am now using the docker package in addition to the synology cloudsync package and simply run the official rclone/rclone:latest docker container with the serve webdav command and use that container to handle communication from cloud sync to my pcloud account.
- Uses officially supported Synology Packages
- Uses a stable version of webdav built into rclone
- Supports the 2FA security since rclone uses that authentication method for pcloud
- Supports easy configuration with cloud sync
- Credentials are token based and stored on the synology diskstation
- It is fast.
- It can work with any rclone backend cloud provider not just pcloud
Guide to set my solution up:
- Install cloud sync and docker packages:
- Login to the Synology with admin access
- Open the Package Center App

- Search and Install the Cloud Sync and Docker Packages

- Download the rclone/rclone docker image:
- On the Registry pane in the Docker app search and add rclone/rclone:latest

- Create rclone config file:
- On your personal computer use a terminal or shell window to run rclone locally.
- If you don’t already have rclone installed on your machine with your web browser follow the instructions here first for your computer’s operating system: https://rclone.org/install/
- Follow the instructions on your computer to create a rclone config file for your desired backend cloud.
- you can find the general documentation for how to do that here: https://rclone.org/remote_setup/#configuring-by-copying-the-config-file
- Copy the config file with your desired backend to your Synology DiskStation. I like to keep files like this in a dedicated folder share.
- launch the rclone/rclone docker image:
- Navigate to the Images pane in the Docker App in DSM
- Select the rclone/rclone:latest image and click launch

- Leave the network settings alone they do not matter

- Choose a name for your container(recommended)
- Configure the resource allocation to your liking and enable auto-restart(recommended)

- Click Advanced Settings
- On the Execution Command tab enter something like the following pattern replacing the bracketed values with your own choices but be sure you remember what you put for these values.
- serve webdav –addr :<rclone_webdav_port> –user <webdav_username> –pass <webdav_pass> –low-level-retries 100 –retries 50 –ignore-times –checkers 10 –transfers 10 –tpslimit 20 –vfs-cache-max-age 0 –vfs-cache-max-size 0 –vfs-cache-mode full <rclone_backend_name>:<path_in_cloud_to_make_available>
- If you’re just using this to backup and never read data back to your NAS you can use –vfs-cache-mode off so that you don’t need free space greater than your stored data on your NAS which is useful for things like Synology HyperBackup where you cannot set a rate limit to stay within your upload speed from your ISP.
- for example you could use the values like this for pcloud (Please use more secure authentication than this example, and don’t put your DiskStation as the DMZ of your network, use a firewall at the very least)
- <rclone_webdav_port>: 8585
- <webdav_username>: droidtastic
- <webdav_password>: thesearenotthedroidswearelookingfor
- <rclone_backend_name>: pcloud
- <path_in_cloud_to_make_available>: / or blank, this is optional but the colon is required in the command above

- Save the command and click next and you can enter the Port mapping
- Enter the port you used in your command under the <rclone_webdav_port> on both sides for local port and container port and use TCP as the type of port

- Clicking next will allow you to setup the config folder to be available to the rclone docker container
- Click add folder and choose the folder that has the rclone config inside of it that you uploaded to your diskstation earlier in this guide.
- It has to be a folder and it needs to be writable (not read only) because rclone will automatically update the oauth token used by several cloud providers since they regularly expire.
- Then enter /config/rclone for the mount path

- Click next check to run the container and click done
- You can click the details of the container and see that the logs show the web dav server running.

- Hard part is done Hooray!
- Connect Cloud Sync to docker container:
- Open the cloud sync app
- Add a webdav connection

- Enter the details from your rclone webdav server:
- Using the previous example we would use the following:
- Server address: http://localhost:8585
- User account: droidtastic
- Password: thesearenotthedroidswearelookingfor

- Click next
- Choose a conneciton name, local path on your DiskStation, Remote path on your cloud account and the Sync direction.

- Clicking next will start syncing that folder with your cloud, in my case pcloud for now.
- Enjoy 🙂
I hope you find this guide useful, I cannot believe no one else even mentions this as a possible and viable solution for Synology Cloud Sync.
Like anything you read online:
Use this with caution, nothing I post here makes any claims that what works for me will work for you and when dealing with data, backups and security it is always best to conduct your own testing in a safe(duplicated, non production data) manner.
Thanks for reading,
– Blaine